Joe Kriz
Top Contributor

Posts: 213  ATN Products Owned: Smart HD Optics
|
Post by Joe Kriz on Feb 24, 2016 7:30:32 GMT -8
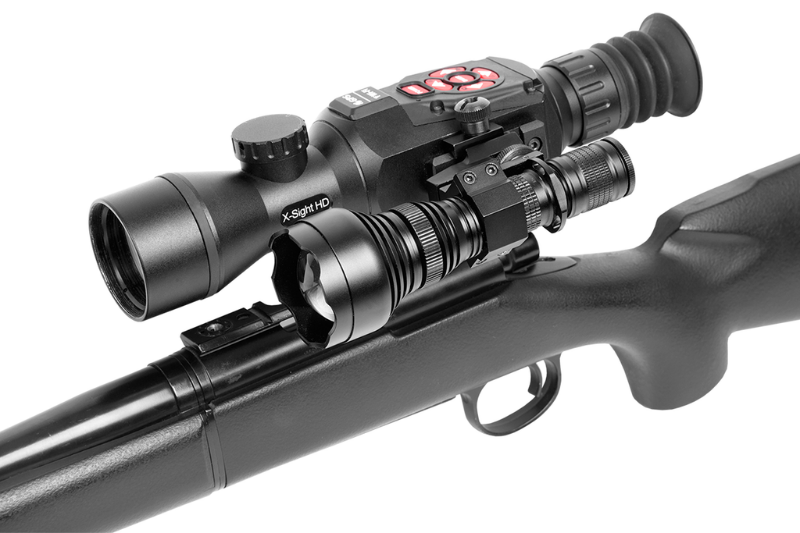
ATN IR850 PRO ILLUMINATOR
Features:
- Flawless white beam with high, medium and low output.
- Forward-click tail switch.
- Adjustable rail mounting system.
- Aircraft grade aluminum body.
- Waterproof to IPX-8 standard (60 minutes at 2m).
Specifications:
- Dimensions: 160mm (length) x 54mm (head) x 25mm (body) x 27mm (tail)
- Weight: 210g
- Range: 300m
Included Items:
- 850mW IR Illuminator
- 18650 Lithium Ion Rechargeable Battery
- Battery Charger
- Adjustable Mount
|
|
|
|
Post by shanejohnson2002 on Jan 28, 2017 19:39:05 GMT -8
So how do you change the brightness levels? I followed the manual, no dice..the "press/no click" method described is just a momentary on function, as far as I can tell.
|
|
|
|
Post by rboyer224 on Mar 4, 2017 7:18:22 GMT -8
Yeah, don't even try. They advertise all kinds of miss-informaton. There are three brightness levels: bright, bright, bright. Pressing the button in any way you can concieve will toggle through the three!!
|
|
|
|
Post by daddyflea on Jul 26, 2017 10:28:37 GMT -8
I too had the same problem the light stays bright and does not change. The trick is to aim it real high and shoot in the Lower Halo.
|
|
|
|
Post by b29driver on Oct 30, 2017 9:27:56 GMT -8
I downloaded the manual and it explains how to operate the different levels. They do work. If you tightened the front part of the battery tube it is locked in the tactical mode and will only be bright. Go to this web page and all your problems will be solved: manual.atncorp.com/atn-ir850-pro/here's the meat of the text: The ATN IR850 PRO consists of 2 possible modes • Tactical mode — a high brightness output, not recommended for general use; • General mode — allows for use low, medium, and high brightness outputs. Insert the provided battery (18650) into the battery tube. Place the Tail cap back over the Battery tube and turn clockwise to secure. TACTICAL MODE 1. To activate tactical mode, tighten the battery tube by twisting the tube clockwise, until snug tight. 2. Your IR850 PRO will only produce a high brightness output when the on/ off button is pressed. Battery tube GENERAL MODE To activate general mode, turn the battery tube counter-clockwise, about ½ turn. GENERAL MODE VERIFICATION WARNING: Do not look directly at the IR without proper Personal Protective Equipment (PPE). 1. Open the camera application from your phone or tablet. 2. With the IR850 PRO turned off, place it underneath the phone or tablet with the lens facing the camera. 3. Press and release the on/off button half-way and without clicking the button. You can view the different IR output stages (low, medium, high) from your phone/tablet camera. Refer to the Figure below. Repeat this step to cycle through the different brightness outputs of the IR850 PRO. 4. Once the preferred output is determined, hold and push the button until a click occurs. Leave the IR on for about 3 seconds. Turn off the unit. The output setting is now saved. 5. If your IR850 PRO does not cycle through different brightness outputs, loosen the battery tube slightly and repeat steps 1 – 5. Low output setting Medium output setting High output setting ACTIVATE GENERAL MODE ONLY NOTE: To activate general mode only with a tightened battery tube, the spring ring needs to be placed towards the lens. 1. Unscrew the IR850 PRO battery tube from the lens, and take out the spring ring and spring from the assembly. 2. Connect the spring ring and spring as shown. 3. Insert the spring into the lens, with the ring making contact with the lens housing. 4. Assemble the IR850 PRO lens and battery tube back together. Ensure the battery tube is snug tight with the lens housing. 5. Your IR850 PRO should now only be able to operate in General Mode. |
|


